Cherry Almond Jam – Homemade jam makes a great, thoughtful Christmas gift that’s budget-friendly and tastes like cherry pie on your toast! Includes step-by-step directions with photos.

My son started preschool in the Fall, so this holiday season we were met with a new parental requirement – the “Teacher’s Holiday Gift”. I know this task shouldn’t be that big of a deal, but I adore my son’s teachers. They do an exceptional job of educating him and the other preschoolers in his class, so I want to give them great gifts that show how much I appreciate their hard work! The problem is, due to aging cars that required two (expensive!) trips to the mechanic in the last three months, my budget is uncomfortably tight this year. After getting some input from friends on Facebook, searching Pinterest, and talking to a few teachers, I learned the following about giving teacher’s gifts:
- Mugs are a definite no. Teachers get so many of these that they could probably start a side business selling mugs.
- Ornaments and knick-knacks are a definite no. Teachers acquire an array of tacky ornaments and knick-knacks over the years that they may or may not feel guilty about tossing. Plus, chances are you don’t have the same decorating taste as your child’s teacher.
- Everyone likes edible, quality food. Chocolates and sweets rarely go uneaten. Also, teachers drink a lot of tea and coffee.
- Good quality note pads and pens to spruce up the teacher’s desk in the New Year can be a nice touch.
- Gift cards for coffee/book shops like Barnes & Noble or for Amazon are best. The teacher then has the option to spend it on themselves, on something for their classroom, or a little of both. Other types of appreciated gift cards include gasoline cards and gift cards for local restaurants.
- To add a personal touch, have your child make a card or help decorate the packaging. This shows that some thought and love went into the gift from the student.
Ideally, based on the points above, I would like to give our teachers a $50-$100 gift card to Barnes & Noble. Unfortunately, our family just can’t swing that this year, so I settled on a $10.00 gift card placed into bags decorated by my son with homemade jams inside (Cherry Almond Jam and Orange Marmalade respectively), a make-your-own scones kit, and some nice tea bags, all adorned with red and green dish towels (I’ve got some great coupons for dish towels!). I think my son’s teachers will appreciate these items because they’ve done fun projects in class like make-your-own apple sauce and make-your-own popcorn the “old-fashioned way”.
For the final touch, I’d like to make a cute label for the basket saying something cheesy and thoughtful, like, “made with love, for my sweet teacher”, but I haven’t come up with anything good yet… If you have any creative ideas for the label, please leave a comment at the end of this post – the cheesier the better!
I’ll be posting photos of the finished gift bags on my Facebook page next week, so be sure to visit and save it to your favorites. Also, if you’ve been enjoying the content on Simple Seasonal, please give my page a “like” while you’re there!
Cherry Almond Jam
Prep Time: 25 minutes Process: In boiling water for 10 minutes
Makes: approximately 6 8 oz jars Serving Size: 2 Tbsp
Ingredients
- 3 12 oz bags of frozen sweet cherries, thawed and drained
- 6 Tbsp Ball Classic Pectin
- 3/4 C almond liqueur
- 3 Tbsp fresh lemon juice
- 4 1/2 C raw sugar
This recipe is adapted from the Ball Blue Book. All of my canning recipes are adapted from sources that test their recipes for food safety.
Directions
1. Before you begin canning it’s important that you first get properly set up. You will need to put your canning jars in the dishwasher and run it on the hottest setting with no soap. The purpose of this is to sterilize them, and so that you have hot jars to ladle your hot jam into to prevent cracking. If you don’t have a dishwasher, you can always boil the jars in water on the stove-top. You will also need to fill a hot water bath (or large pot) 3/4 full with water and turn the heat to medium-high. This will be the water that you process your jam in at the end, so if you turn the heat on now, it will be ready for you at the end of the process. The heat from the boiling water will kill bacteria and other little nasties and it will seal the lids. Finally, heat some water in a tiny saucepan for sterilizing your lids and rings. You will also need a ladle, a funnel, a magnetic lid grabber and a jar grabber.
If you’re new to canning, I know this list can seem a bit overwhelming. Don’t worry – after you’ve done it once, you realize that it’s actually a fairly easy process! Below are some links to an inexpensive canning starter set that will give you everything you need for this recipe. You can use a large, deep pot in place of the water bath, but all the other items are exactly what I used when I began. By the end of this recipe you’ll be a confident canner!
1. After thawing cherries, drain and set juices aside.

2. Finely chop the cherries with a knife and then combine them in a saucepan with the pectin, almond liqueur, and the lemon juice.

3. Bring the cherries to a boil, stirring frequently to prevent burning, then add the sugar and return the mixture to a boil. Boil the jam at a hard boil for 1 minute, stirring constantly, and then remove from the heat.

4. Dip your ladle and funnel into your boiling water for approximately 1 minute to ensure they are sterile. Next, ladle the jam into warm, sterilized canning jars. Be sure not to touch the insides of the jars and resist the temptation to lick your fingers throughout the process (this part will be difficult). This will ensure that you create a sterile environment within the jars by the time you’re done.

5. Next, clean the rims of your jars with a paper towel that you dipped into boiling water. If there is jam on the rims of the jars when you place the lid on top, it can compromise the integrity of the seal.

6. Now you’ll get ready to sterilize your lids in the small saucepan of hot water. You’ll want to be careful not to boil the lids, as this can damage the seals (I know, there are so many things to remember when you’re canning), so bring the water to a boil first, remove from the heat, and then place the lids inside. Wait 5 minutes before using, so that the heat has time to work it’s bacteria-killing magic. Next, remove the lids with the magnetic lid grabber, being sure not to touch the bottoms of the lids, and place them on the jars.

7. Finally, place your rings on your jars. Now comes the tricky part – you will screw the ring on until it is just tight, and then go back the other direction about one-eighth of an inch, or a couple of millimeters, loosening the ring a bit. This is very important – don’t skip this step! This will allow some air to escape the jars while you’re boiling them, and then create a vacuum as they cool, sealing the jars.

8. Place the jars into the boiling hot water bath (or large pot) using your jar grabber. Bring the water to a full boil, place the lid on the pot, and set your timer for 10 minutes. I used too small of a pot, because I’m too cheap to buy a larger one, so water spilled all over my stove… I don’t recommend doing this.


9. After the jars have boiled (or have been “processed”) for ten minutes, remove them from the pot using your grabber again and place them upright on some dish towels to cool. You will need to let them rest for 24 hours, so pick a place where they won’t be in the way, and won’t be a temptation for little hands or curious pets. That said, I do encourage you to crack open a jar early! You will just need to store it in the refrigerator after it has been opened.
10. Once 24-hours have elapsed remove all the rings from your jars. This will prevent moisture from forming around the edge of the lid and ensure the integrity of your seal. Your jars are now ready to store in a cool, dark place, such as your pantry or your basement. They will keep for 12 months. Once a jar is open, it will keep in the refrigerator for 1 month. When storing an opened jar, use one of your rings to keep the lid on tight.


I used this jam for some Christmas thumb-print cookies, and they tasted especially festive! Homemade jam makes a great, thoughtful Christmas gift that's budget-friendly and tastes like cherry pie on your toast! Includes step-by-step directions with photos. This recipe is adapted from the Ball Blue Book. All of my canning recipes are adapted from sources that test their recipes for food safety.
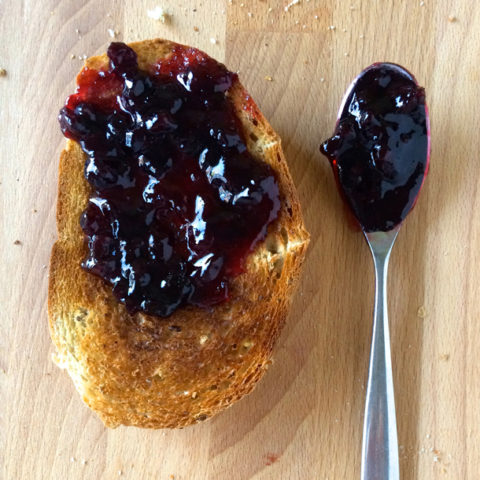
Cherry Almond Jam
Ingredients
Instructions
Notes




I love homemade jam and you’ve made the sometimes intimidating process look so simple. Also the combination of cherries and almonds is particularly nice at holiday time. What a great gift idea!
Thanks Laura! I’ve made this a yearly tradition to make it as holiday gifts. It seems like EVERYONE loves it and expects it now. It must be all the booze that are cooked into the jam 😉 The best thing is that it’s made from frozen fruit, so it can be made any time of the year!
I love your step by step tutorial here, scheduling this to share with my readers:)
Thanks for sharing Sara! I’m glad you enjoyed the tutorial aspect of this post. Canning is one of those things that I love doing with a friend, so I try to write my canning posts as if I’m teaching a friend how to can. 🙂
Does the alcohol all cook off? Wondering if safe for children