Small Batch Crunchy Canned Dill Pickles – The PERFECT canning recipe for dill pickles! Complete with step-by-step photos and tips on how to make them look beautiful and get that coveted pickle “crunch!”

This summer I’ve been getting pickling cucumbers in 2 or 2.5 lb increments from my CSA, and as a result I’ve embraced the idea of making pickles in small batches.
I have to say, as much as I love pickles, I’ve become all about small batches because I really don’t want TEN jars of dill pickles. By making small batches I can have 3 or so jars of 3 or so varieties, and that’s much more fun to eat in the end!
One of the challenges of canning pickles is achieving a “crunch.” Oh, how often I’ve bitten into a canned pickle that has amazing flavor, but have been disappointed by a rubbery “squish” instead! In this post I’ll share my tips for getting that perfect “crunch” every time.
To begin you’ll want to start out with amazing pickling cucumbers. I got mine from my CSA and I’m pretty sure they were picked the morning of the day I picked them up, and I pickled them the next day.
Basically, fresh cucumbers are, well, fresher, and will help in the crunching department! If you’re not part of a CSA, please avoid the supermarket for your canning produce because you’ll overpay, and it will be days old.
I’ve been seeing pickling cucumbers at a number of farmers markets and farm stands this season, but driving around in search of the perfect ingredients can be time consuming. When I need to find canning ingredients that my CSA doesn’t carry, I usually start with a Google search of local farms and then I call around until I find someone who has what I need. I rarely have trouble if I’m willing to ask the farmers who are wanting to sell.

 The next key to a crunchy pickle is “cold packing” them. This means making a hot brine in a sauce pan that you’ll pour over raw cucumbers that have already been packed into their jars.
To make the brine I place my water, vinegar, sugar, and salt in a saucepan with pickling spices that have been neatly tied up in a cheesecloth.
For food safety, the ratios of water, vinegar, sugar, and salt are based on the dill pickle recipe that can be found in the Ball Blue Book. I just did some math to make the recipe smaller. Also, the spice blend is uniquely mine.
I used to put the spices directly into my jars, but I’ve found that over time the cloves and the allspice would discolor my pickles and would also begin to flavor the pickles too intensely. By simmering the spices in the brine, I have more control over the balance of flavors.

After the cucumbers, the dill is the second most important part of making dill pickles.
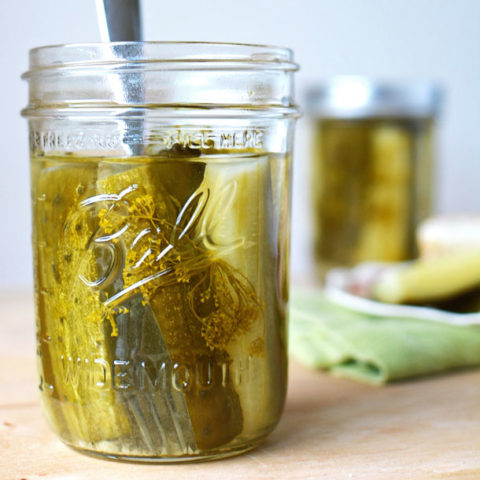
For dramatic presentation I like to place my dill on the side of the jar. I know I risk having it float to the top, but I like a little drama in my life. I’ve found if I pack my jars on their sides, nice and tightly, this isn’t that much of a problem.
This season I held out to make my dill pickles until the dill was flowering. I think the flower adds a little extra drama to the aforementioned pickle drama.

Stacking your raw cucumbers on top of your dill will help to achieve a pretty dill frond and flower design. Side packing also makes it easier to get a tight pack.

Finally, you want to place your lids and rings on your jars and process them in a hot water bath canner for 15 minutes.
After adding the hot brine, add them to the canner as quickly as possible and only process them for 15 minutes – not a minute more and not a minute less. This means you’ll have the right amount of time to kill microbes, but you’re not overcooking your cucumbers.

The end result is three crunchy jars of dill pickles. You can begin eating them right away, but I recommend giving them a week or two to allow the brine and dill to work it’s magic on your cucumbers!


The PERFECT recipe for small batch crunchy canned dill pickles! Complete with tips on how to can, how to make them look beautiful in the jar, and how get that coveted pickle "crunch!" I chose not to calculate the nutritional info for this recipe, as I felt it wouldn't be accurate since most people don't drink their pickle juice. The average pickle is a few calories and my educated guess on sodium content for these would be around 350mg per a pickle, thus they should be enjoyed in moderation!
Small Batch Crunchy Canned Dill Pickles
Ingredients
Ingredients
Gear
Instructions
Notes
More canning recipes from Simple Seasonal…

Golden Apricot Jam

No Sugar Added Canned Applesauce

Small Batch Canned Pickled Red Onions


I’ expectations never made pickles :(. But, I sure do love them! They look so easy, I really should give them a try. Thanks for the recipe and inspiration!
Thanks Renee! They really are pretty easy. They’re one of my favorite things to can because they involve less chopping and prep work than most recipes.
I’ve always wanted to make my own pickles! They bring back so many childhood memories. My friends and I would always enjoy dill pickles stuffed with a peppermint stick right down the middle. So delicious! Thanks for sharing!
Pickles with peppermint sticks?! I never hear of such a thing, but I looked it up on google and it’s real! I’m going to have to save a jar for pickles to enjoy with my candy canes this Christmas. Thanks for sharing. That’s awesome!
I love dill pickles but have never made my own. These look wonderful!
Thanks Mel!
These look AMAZING! I haven’t gotten my courage up yet to try any canning recipes, but I may have to try this one! Too yummy!!
Canning is easier than it looks and sounds. I found the first recipe I did to be a little bit of a challenge because I had to learn canning techniques, but after that it’s been pretty easy breezy. I mainly can things that aren’t better frozen. Things like applesauce, jams, pickles, and salsas. By making my own I save quite a bit on groceries in the winter, plus it’s a little taste of summer during the colder months! If you’re interested in learning about canning, the Ball Blue to Preserving is an excellent place to start.
I love that this makes a small batch – Definitely cannot wait to give this a try! We recently had a dill pickle martini that was so yummy – I bet that these would be perfect in there!
Oh yum! I’m going to have to say something to my mixologist (aka husband) about the dill pickle martini. You’re not by any chance going to be posting a recipe for it on your blog?
Okay- I’m there. You have eliminated my last excuse that I really have no idea how even where to begin. Good post, very clear instructions.
Thanks Elizabeth! Glad to hear that the instructions were very clear. I was trying to write them for someone who has little to no experience with canning.
Can you use a pickling slice mix? I bought some from a local Amish store.
Hey Krista! I don’t want to say either way because I don’t know what all the ingredients are in your product. If your mix came with instructions I would follow the water/vinegar/sugar/salt ratios recommended on the packaging. That said, you can safely add or take away spices as you like!
So practical AND the photos look amazing too btw. Thanks for sharing this awesome tip! 🙂
Thanks Levan!
I cannot wait to grab some cucumbers and do my first batch of these beauties. I love pickles and never tried to make my own. You definitely make it look, like it’s so easy…so I am in 🙂 Thanks for sharing it!
Thanks Oana! Pickles really are pretty easy. It you’re newer to canning, they’re a good place to start. My favorite thing about making my own pickles is having control over the spices. I sometimes vary the spice blend to get different flavor profiles. It keeps things interesting!
Do you use table salt or pickling salt?
For this recipe I used table salt with no additives (not iodized and no anti-caking agents). Great question as some recipe call for table salt and some call for pickling salt and there is a difference in weight compared to volume.
Can I make this with small Kirby pickles instead of cucumber wedges? I like the cucumber whole.
Little Kirbys would work just fine! I would just trim the ends off so the pickle juices can get to the inside of the cucumber. If your kirbys are much thicker than your typical cucumber spear consider adding 5-10 minutes to the processing time depending on how thick they are. Good luck!
This recipe looks really good, but I would like to make some sliced pickles to go on hamburgers. Can I use this same recipe?
Hey Suzi- I’ve never tried this recipe with sliced cucumbers before. There is no reason that this wouldn’t be safe as far as preserving practices go. My only concern is that they won’t be as crunchy as the pickle spears. I’m currently taking a break from canning because I’m 7 months pregnant, and abhor a hot kitchen, but I really should give this a try next summer! If you give it a go before than be sure to come back and tell me wether they turned out crunchy!
These look great! Just to verify, it’s okay to process these in a hot water bath, and I don’t need a pressure canner? Thanks!
That’s right. This is a hot water bath recipe. It calls for plenty of vinegar and salt, which makes it inhospitable for nasty little microbes!
Can you add garlic to this recipe?
Sure you can! Peel the garlic and pack one to two cloves at the bottom of the jar at the same time you pack the cucumbers and dill. Next proceed with the recipe per my original directions. Enjoy!
What size canning jar are you using?
The canning jars I used are a pint, which is 16 ounces.
Hi
These are beautiful. I’m looking forward to making this recipe next weekend.
By the way, did I miss it? What size jar are you using?
Thanks,
Pamela
The canning jars I used are a pint, which is 16 ounces. Best of luck with your canning next weekend!
This looks like a great recipe! I was searching for something that included the dill flower, and the small batch quantity is perfect for what we’ve gotten from our garden. One question: is it necessary to adjust the processing time (jars in boiling water) for altitude? I live at around 5,000 ft.
Ah, nevermind, I found the answer here: https://www.freshpreserving.com/altitude-adjusting.html
Thanks for sharing the above link!
I have always used the Ball stated high altitude adjustments in their canning guides. My pickles constantly turned out softer than desired. In checking with my county extension agency online website, dill pickles at high altitudes (mine is 5530), I can safely can these for 15-20 minutes tops. Unlike the stated 15 minutes plus 10 for my high altitude in the Ball reference chart. So I feel secure in following the county extension’s guidelines.
It looks like you found the information that you were looking for. Happy canning!
I love what you included in this recipe! Is it ever common to add cinnamon? It is my favorite spice and I wonder if it would add anything beneficial to a pickle.. Curious to try it! Thanks for your recipe.
Im curious. I recently came across a recipe very similar to yours and she allowed the brine to cool down before she added it to the pickles in the jar. She only had the water up 3/4 of the jar in canning pot and then turned water down to a simmer. Processed for 7min and then removed the jars and turned them up side down and allowed to cool 24 hours. Does this sound like a safe method of canning to you?
Hey Debra! I think you’re smart to be concerned about the safety of the above mentioned recipe. That said, allowing the brine to cool first is fine as long as this recipe you mentioned keeps it covered, clean and doesn’t let it sit for many hours (The benefit of having hot or warm brine is that you don’t have to worry about your jars cracking when you place them in boiling water).
Pretty much everything else you mentioned about this recipe has me concerned though… It’s important that the jars are submerged and boiled so that the heat in the jars can become hot enough for long enough to kill any microorganisms present on the food. I’ve never heard of a water bath recipe being processed for less than 10 minutes. The high heat of boiling is also need to create a strong vacuum in the jar, which will create a strong seal. Additionally, turning the jars upside down seems counter intuitive as far as creating that good vacuum and seal. I’m of the belief that canning technique is not the place to get creative when there are standards that have been tested in a lab by food scientists for safety. Even if that means my pickles have slightly less crunch, I’m not concerned about botulism, which is so dangerous.
I follow the techniques as recommended by Ball Canning as I use Ball jars and lids. Here is the link to the food safety tested explanation of technique for water bath canning.
Wow I’ve gotta try this recipe! Mu husband loves pickled things! Can I use this recipe for pickled eggplant too?
I wouldn’t change up the veggies in the recipe. I’m not saying that it wouldn’t work, but I can’t say with full confidence that it would meet food safety standards then. Picked eggplant does sound yummy though!
My husband and I always disagree about processing time. He says 10min from the time jars are placed in the canner. I say 10min after they start to boil. Please settle this
LOL That sounds like the sort of disagreement my husband and I would have! It’s 10 minutes from the time that the water starts boiling with the jars in the canner. That said, you should achieve a hard boil before adding the jars so that the water returns to a boil quickly.
I tried this recipe three times and every time it has come out too salty. I’m using regular salt. Can I reduce the amount?
Hi Sunny! I’m sorry the recipe didn’t turn out as you had hoped. I would NOT decrease the salt if you’re canning this recipe. My first thought is that you’re cooking the pickle juice down too much, but I’m guessing you have probably already thought of that having made this recipe 3 times. Kudos to you, because that is some serious determination!
In water bath canning we’re preserving foods first by heat, but since the heat (and pressure) aren’t quite high enough to get everything, we also kill bacteria and inhibit growth with acid, salt and/or sugar. There has to be enough acid/salt/sugar in the environment of the jar so that the microbes can’t survive. All of the canning recipes on Simple Seasonal have developed after referencing a number of recipes that have been tested for food safety. I maintain the food safety tested acid/salt/sugar ratios while only making adjustment to spices. The only way I would consider lowering the salt of my pickles is if I pressure canned them, but then they would become a mushy mess!
All to say… If less salt is what you really want, you can totally make refrigerator pickles. They’re one of my favs because they are extra-extra crunchy. Basically follow the above recipe, but just use 2 tsp of salt. Don’t water bath can them. Let the pickles brine for 24-48 hours in your refrigerator. Store them in your refrigerator and enjoy for up to 7 days!
Awesome recipe and GOOD Advice! If anyone is worried about too much salt. WASH it first.
I said the same thing so i washed my pickle/ hubby said salt was good! 5 Stars!
I’m happy to hear you enjoyed these Miriam!
Can I use dry dill weed or seeds in place of the fresh dill?
Hi Michelle- You can substitute with dry dill weed. I find the dry dill has a little different flavor. You’ll likely find it less sweet and floral. All to say, the dry dill weed will work in a pinch, but probably won’t be a good.
I made this, but didn’t have enough pickling liquid to completely fill the jars (with the headspace, of course)! Had to make a second batch of it before I could can…
What would be the time if you used smaller jelly jars?
Hi. Love the technic but we did find them too salty for our taste. Would pickling salt produce a less salty pickle?
It’s important to use non-iodized salt or your pickles may taste bitter and/or be too salty. Regular table salt shouldn’t be used for canning. You can also buy pickling salt.
I hope someone see this…..When you put the jars into the boiling water, do you wait until it comes back to a boil before starting the timer? Or do you time it from the second the jars go into the boiling water?
How much pickling salt would you recommend for small patch pickles.
Thanks
Sue
I made your recipe with sliced pickle chips and green beans. I can’t wait to try them.
I adore this recipe. Fast and easy with my small garden produce versus trying to do 20 jars at once. I use a steamer canner, works great. Next batch we’re going to try adding a jalapeño for fun.
I love this recipe. I did pickles and peppers in different jars. I gave them to a few friends and they loved them.
Thank you for this easy recipe.